How to Migrate Your WordPress Site to Cloud Hosting: Step-by-Step Guide
Migrating your WordPress site to the cloud may be tedious, but it is not very hard. It can be a transformative decision that can take your website to new heights.
Cloud hosting is more efficient, scalable, and secure than physical servers. With cloud hosting, you can imagine a world where your website runs smoothly and your visitors feel happy.
Everyone who needs an easy approach to understanding the details of migration can use this guide. From selecting the provider to testing your sites, this guide will provide everything you need for a perfect transition.
Table of Contents
ToggleStep-by-Step Guide to Migrating WordPress to Cloud Hosting
With our simple and easy to actionable guide, you can migrate your WordPress website to cloud hosting. Explore our simple guide:
Step 1: Select a Cloud Host
- First, select the right Cloud Host for you. Cloud hosting providers provide different services at different rates. Keep on comparing RealCloud vs AWS vs Google Cloud vs DigitalOcean vs SiteGround. Choose a host that meets your requirements regarding scalability, security, etc.
Step 2: Backup Your Website
Time to back up your WordPress Website. Backup is a must to ensure that you have backup copies of your files and your database in case something goes wrong.
With Plugin: Choose a plugin such as UpdraftPlus or Duplicator to back up your site.
Manual Backup: If you do not want to use Plugin and want to do a backup manually, then here is the manual command line that you need to follow.
- Navigate to Your WordPress Directory: cd /var/www/html
(Replace /var/www/html with the actual path to your WordPress directory)
- Backup WordPress Files: Create a compressed zip file by zip -r wordpress_backup.zip WordPress
(Replace wordpress with the name of your WordPress directory)
- Backup WordPress Database: To backup the database, mysqldump –add-drop-table -h localhost -u wpuser -p wordpress > wordpress_backup.sql
(Replace localhost with your database host, wpuser with your database username, wordpress with your database name)
Step 3: Set Up Your Cloud Hosting Account
Sign up for your cloud hosting account settings. We are using RealCloud cloud host, log in through the official website and set up an account as you need.
Step 4: Host the WordPress on the Cloud Server
When you have your server up, you should proceed to install WordPress on the server. Most cloud providers provide a one-click install for WordPress. We are taking the example of RealCloud Host.
- Go to your cloud hosting panel, which is app.realcloud.com
- Log in with your credentials.
- Install WordPress Standalone Kit from the Marketplace and install me.
Note: Select the latest PHP version only. Choose other settings as per your needs.
Step 5: Transfer Your WordPress Files
Once WordPress installation is completed, you can upload your backup files to the cloud server. In the RealCloud server, there are several ways to upload WordPress Files.
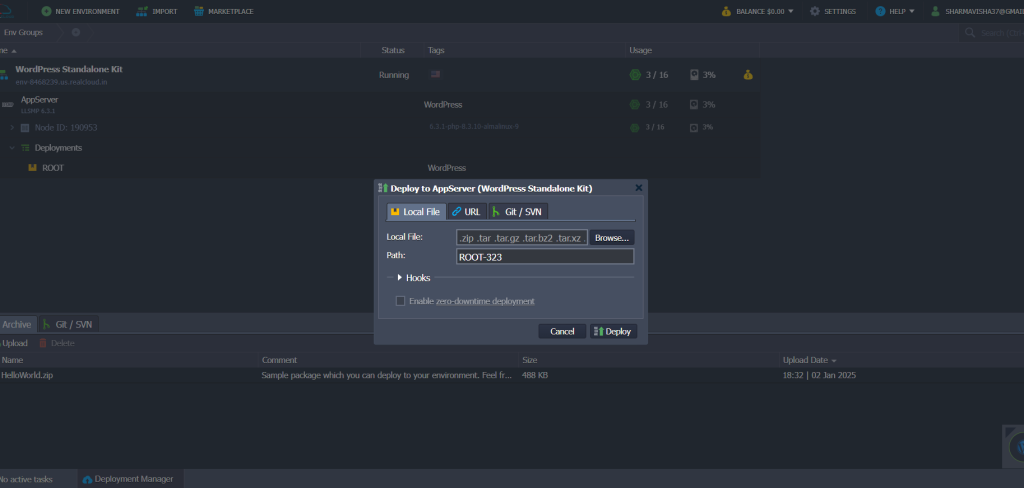
Deployment Manager: On your dashboard, under the Appserver, there is a “Deployments” option. You can directly upload your all files in the .zip format etc.

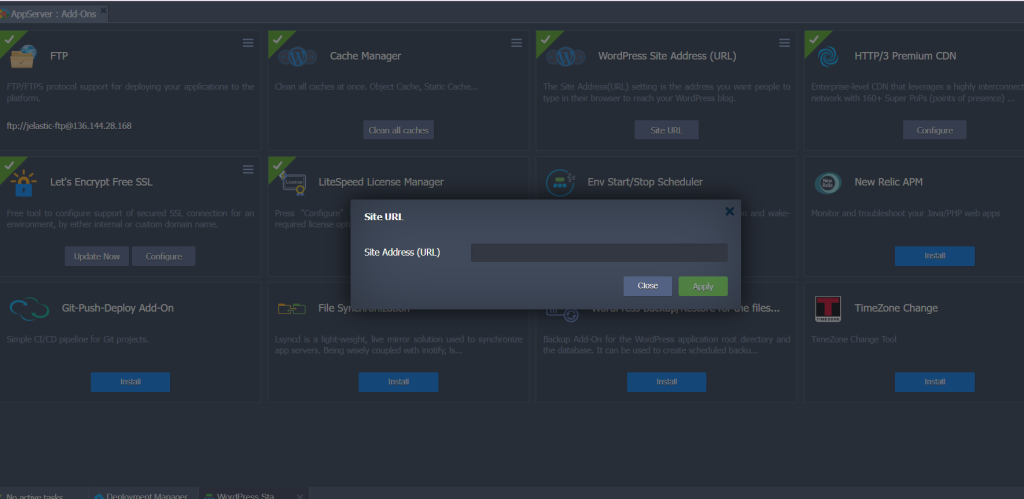
- FTP: If you want to upload files with FTP, install FTP from the “Add-on” Section and connect FTP. With RealCloud, you will get your FTP credentials on your registered mail ID.
- Server-To-Server: With Server-to-Server option, you can upload files directly by links.
Note: Using Depolymangent Manager is the easiest way to install and set up WordPress.
Step 6: Import the Database
The WordPress database holds all the content for your website as well as the configurations and user data. In its place, you have to transfer it to the new server.
- Log in to your old server’s phpMyAdmin.
- Export the database as a .sql file.
- Log in to your new server’s phpMyAdmin.
- Login with the credentials received on your registered mail ID.
- Import the .sql file into the new database.
Update the wp-config.php file with the new database details:
- Database name
- Username
- Password
- Host (usually localhost)
Step 7: Update DNS Settings
Now, change the DNS settings to lead to the RealCloud server.
- Go to your domain registrar login and access your account page.
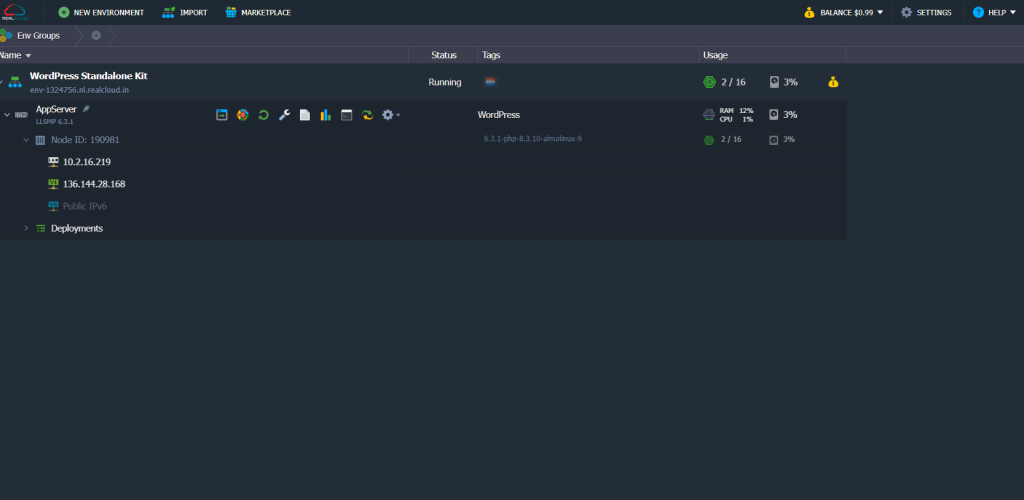
- Change all the DNS records with the new server IP address. Find your RealCloud DNS in the registered ID’s mailbox as well as under “Appserver” on the dashboard.

- With RealCloud, it will take some minutes to update.
Once your DNS settings are completed, set your WordPress Site Address(URL). Go to the Add-on section, install the “WordPress Site Address( URL) and copy and paste your website link there.

Step 8: Maximizing On Your Cloud-Hosted Environment
To receive the maximum performance out of your Cloud Hosting, improve your server.
- Recommended caching plugins for your website are WP Rocket and W3 Total Cache.
- Content delivery should be optimized by using a specific Content Delivery Network, Cloudflare.
Step 9: Regularly Update and Maintain Your Website
After migrating to cloud hosting, regular maintenance is essential to keep your site running smoothly.
- Update WordPress core, themes, and plugins regularly.
- Monitor server resources and optimize as needed.
- Set up automated backups to avoid data loss.
- Stay informed about your hosting provider’s updates and new features.
By staying proactive, you can ensure your website remains fast, secure, and reliable on the cloud.
Conclusion
Moving your WordPress site to a cloud hosting service doesn’t have to be overwhelming. It is an opportunity to transform your website into a faster, more reliable, and secure platform. By using the above steps, you can confidently migrate your WordPress website to a cloud hosting provider, reaping the full advantages of cloud hosting such as scalability, reliability, and improved performance.
Make sure to make a complete backup of your site as well as stay informed about the features your hosting provider offers. Small updates can lead to big improvements. You are not migrating to the cloud host, but just to a future where your website can perform its best.
Frequently Asked Questions
The first action is choosing a reputable cloud host with all the features and the price range preferred by the user, from an array of options such as AWS, RealCloud, Google Cloud, DigitalOcean, and SiteGround.
Back up your site and its files using UpdraftPlus or Duplicator for files and MySQL databases. It is especially important to store the ‘backup’ files in another physical computer or an online drive for security purposes.
A Little knowledge is required. However, every cloud host has a WordPress one-click installation feature available. Still, you needed a bit of knowledge for the one-click installation process.