Set Up Your WordPress Site on WP Cloud Hosting: Step-by-Step Guide
Setting up a website may seem daunting. But WP Cloud Hosting makes it not just quick, but also seamless and rewarding. Whether you want to set up a blog website, business website, or personal project, follow these simple steps.
With WP Cloud Hosting, you can have your website up in no time. It makes everything smoother, faster, and more secure. It allows you to focus on creating the content and experience you’ve always dreamed of.
Table of Contents
ToggleStep-by-Step Guide to Setting Up WordPress with WP Cloud Hosting
A step-by-step guide for setting up a WordPress site on WP cloud hosting. You can easily set up your WordPress website. Follow the shared steps:
Step 1: Choose a Host
To host websites with WP Cloud Hosting, selecting the right hosting provider is crucial. The most popular and reliable options include:
- Bluehost
- SiteGround
- WP Engine
- RealCloud
Selecting your Host as per your budget and the requirements of your website. Opt for providers specifically optimized for WordPress as they are easy to use and come with tailored features. Many providers allow additional services such as free SSL certificates, automatic backups, and customer service. Take your time to compare the price and features to get the best option for yourself.
Step 3: Buy a Domain Name
A domain name is the web address of your website, for example, www.mywebsite.com. It is the website name or internet address for your site. A domain can be bought through hosting providers or directly with registrars like GoDaddy or Namecheap. Choose a domain name that is easy to remember and related to the content of your site.
Here are some tips for choosing a good domain name:
- Keep it short and simple.
- Avoid numbers and hyphens.
- Specify keywords that you are using in your business or blog.
Step 4: Sign Up for a Hosting Plan
Visit your chosen hosting provider’s website and:
- Select a plan (basic plans work well for beginners).
- Create an account.
- Complete the purchase( include the domain name if you want)
During signup, the provider might offer add-ons like site backups or privacy protection. You can choose these add-ons if they fit your needs.
Step 5: Install WordPress
Most hosting providers give a one-click WordPress installation process. If you are using RealCloud host, then here are the steps to follow to install your WordPress-
- Log in to your RealCloud hosting account, through https://app.realcloud.in/
- Go to the Marketplace option in your dashboard.
- Click on “WordPress Standalone Kit” and install it. This is basic WordPress.
- The process generally lasts a few minutes.
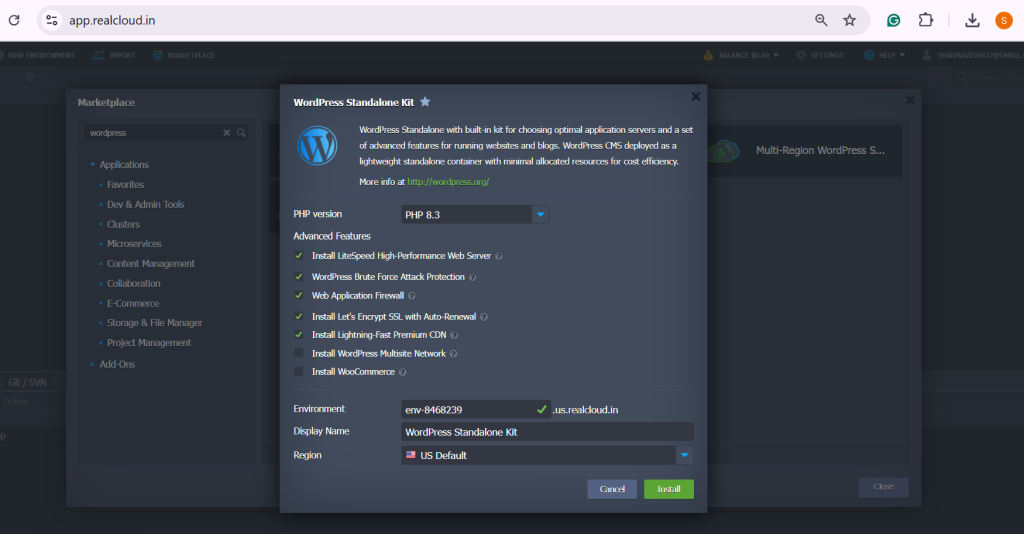
After installation, ReadCloud will send you details of the Admin Panel link with a Login ID and Password on your registered mail ID. They provide a one-click WordPress installation.

Step 6: Login and Set Up Your Dashboard
After installation, log in to your WordPress dashboard. Click the registered link on the mail or
- In the address bar of the browser, enter the line: www.mywebsite.com/wp-admin (please, type your domain instead of mywebsite.com).
- Enter your username and password.

Here you can modify your site’s look and content part and every single setting.
Key Sections Include:
- Posts: Use this section to add dynamic blog content, news updates, or articles.
- Pages: Use this section of static and informational content such as an “About Us” page, “Contact Us,” etc.
- Appearance: Customize the look and feel of your website
- Plugins: To enhance the value of your site by adding some extra features like contact forms, SEO tools, etc.
Step 7: Choose and Customize a Theme
Themes determine the overall design and layout of your website, including colours, fonts, and structure. There is a large variety of free and paid themes available in WordPress. To select and customize one:
- Under your dashboard, go to “Appearance” > “Themes”.
- To upload any theme, should click on “Add New”.
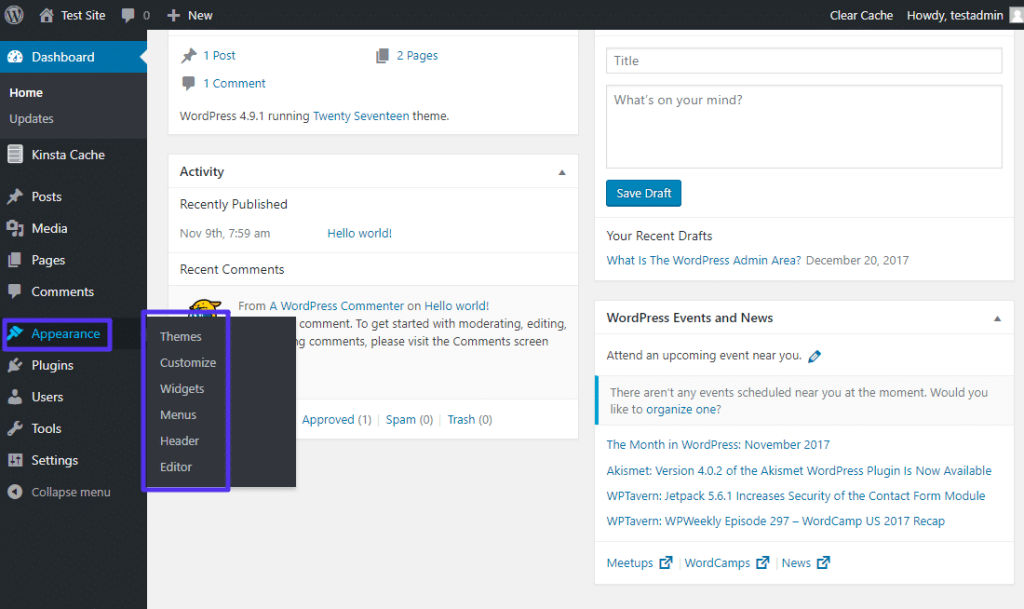
Download the preferred theme and then set it up. The customization is even easier because certain themes possess pre-installed settings. When choosing a theme ensure that it is mobile responsively to suit the mobile devices.
Step 8: Add Essential Plugins
Plugins add extra features to your website. You can add below essential and popular plugins include:
- Yoast SEO: Helps to improve your site’s visibility on search engines.
- Contact Form 7: Creates contact forms for visitors to reach you.
- UpdraftPlus: Provides backup solutions.
To Add Plugins:
- Go to “Plugins” > “Add New”.
- Search for the plugin name you need.
- Click “Install Now” and then “Activate”.
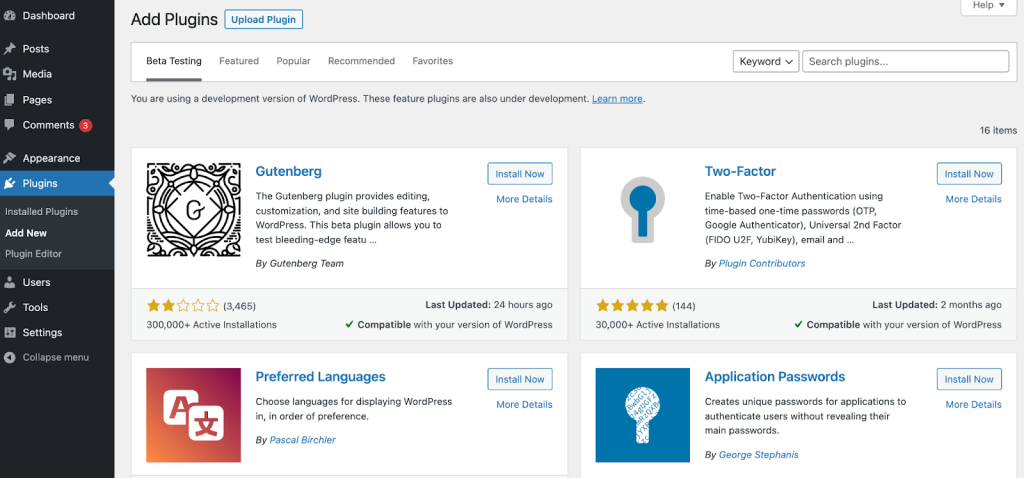
Be selective with plugins. Remember, too many plugins can slow down your site. Install plugins that are necessary for your goals only.
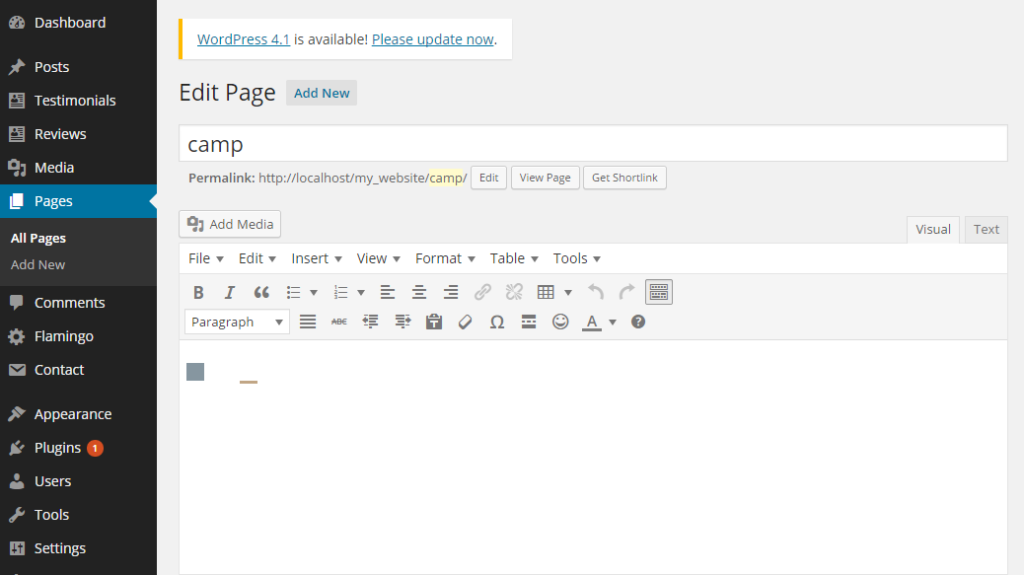
Step 9: Create Pages and Add Content
Your site needs pages and posts to share information:
- Pages: Use for fixed sections like “Home” or “Contact Us.”
- Posts: Use for blog articles or updates.
To Create a Page:
- Go to “Pages” > “Add New”.
- Add a title and content.
- Click “Publish”.
Step 10: Secure, Test, and Launch Your Website
Before launching your site, follow these final steps:
- Set Up Security: Protect your site with a security plugin like Wordfence. Select Bullock Grind passwords. Also, ensure that you upgrade your WordPress often.
- Test Your Site: Take a sneak peek at your website by right-clicking your mouse, and looking at how your website looks on the desktop version and the mobile version. Correct all typos, nonfunctioning links, and other non-working links.
- Optimize for Speed: The best way to speed up the loading is the caching plugins like W3 Total Cache and image optimization.
- Backup Your Site: Maintain good backups using plugin UpdraftPlus and back your site at regular intervals.
- Go Live: Include your website’s URL when sharing content with your audience.
Finally, when your site is up, watch its performance, and make necessary changes. Make use of the likes of Google Analytics to track visitors and know what content they find interesting. Making adjustments frequently helps to maintain the interest of the audience on the website.